Viewer LiveView
Selecting a camera from the viewer home screen, you’ll see this live view Screen which can be viewed in Portrait or Landscape view. See #15 Rotate Screen.
It shows live streaming video from your other Wardencam connected “camera” devices
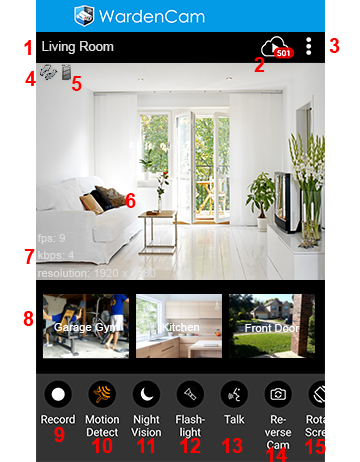
1. Camera Name
You can change the camera name from the camera device’s menu. Camera Menu
2. Cloud recorded videos
Opens the Cloud View to see recorded videos from cloud storage.
3. Camera Options
- Camera Settings
- User Manual
- Store
- Rate
- Like Us On Facebook
4. P2P Connection 
Shows the peer to peer(P2P) connection status.
Red exclamation mark indicates peer to peer connection has failed.
If P2P connection failed, the camera resolution will fall back to 480p. Ask your network administrator or mobile carrier to enable P2P capability.
5. Battery 
Shows the battery power percentages and charging status.
6. Live View and Auto-Focus
Watch your camera live stream
Tap the live video to auto-focus, (works when motion detection is disabled).
Live video are normally streamed via peer to peer connection.
7. Fps, Kbps, & Resolution
Fps = frames per second
Kbps = kilo bytes per second
Resolution = image resolution in pixels
8. Other Cameras
If other Wardencam camera devices are connected to your Google Account, it will appear here. You can select which camera to view live.
9. Record
Records the video regardless of motion detection. This is 24/7 recording or until the the recording is disabled.
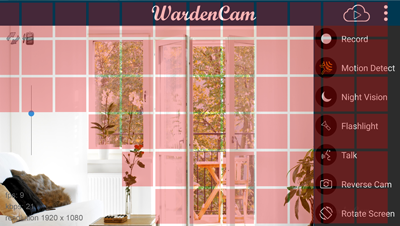
10. Motion Detect
Turn on or off the camera’s motion detect.
For Regional Motion Detection, View in landscape mode with the #15 Rotate Screen Button. When on, a red grid will appear. The red zones are motion detection areas which records if theres movement. The clear(non-red) areas as you see on the bottom left of the image will ignore motion,
The motion detect number is the number of motion detected events and video saved.
11. Night Vision
For low light conditions, use this feature to increase constrast to see streaming images better
12. Flashlight
Turns on the LED light on the camera device remotely. Only the rear camera has the flash light.
13. Talk
Hold the button and talk. Release the button to send the voice to the camera device.
14. Reverse Camera
Switch between the rear and front camera.
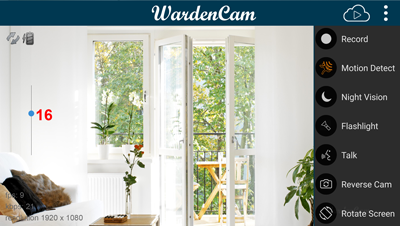
15. Rotate Screen
Rotate between portrait and landscape.
In landscape mode, use pinch gesture to further scale the video
16. Zoom In
Rotate from portrait to landscape.
In landscape mode, use pinch gesture or the zoom bar to scale the video, and finger drag to focus around when zoomed in.